At various times, people have been taken aback that I don’t applique per hand… ever. If we are laying it all out on the table, then you should know that I don’t even hand bind any of my quilts. In spite of my lack of affection for hand sewing, I am glad to have seen a revival of the slow stitching movement. I will never cease to be awed with the amazing work needle turn appliquers and English paper-piecing enthusiasts create… but when it’s all said and done, it’s simply not for me.
No matter what applique technique you prefer, let me tell you why the starch applique technique (turned edge) has become my method of choice, and one that I am obviously super excited about: because it allows me to make quilts that have the look of hand applique, without sewing by hand.
For me the applique is the fun part, but with the next challenge and big hurdle looming just around the corner: Umm... How do I quilt it now?!?
There are different approaches to quilting an applique project, so I thought it might be helpful to make a comparison, and share the pros & cons of stitching applique BEFORE or AFTER quilting. Be sure to read to the end where I share the How-To for stitching applique to an already quilted piece.
So, let's start out with the more commonly used approach, and look at what are the advantages and considerations to:
Stitching applique BEFORE quilting:
- It's much easier to stitch and turn smaller, individual blocks under the machine, or even for that matter an un-quilted quilt top.
- Since shapes are appliqued before quilting, a walking foot, or free motion foot can be used for quilting
- Quilting around shapes adds loft to applique shapes.
- Custom quilting highlights and showcases applique.
- Stitches are hidden inside the quilt, and cannot be seen from the back of the quilt.
Considerations
- It can be a challenge to mark a continuous quilting design around the applique shapes.
- It can also be a challenge to quilt around the shapes, especially if you are using straight line quilting or a uniform design.
- Quilting over applique may not be desirable, which would be the only option if working with an edge to edge design.
- If you are using custom quilting services, it is more expensive to have custom work from a free motion longarm quilter.
So, how does this compare to:
Stitching applique AFTER quilting
- Quilting designs can be more easily marked before adding applique shapes, thus the design is continuous, taking the challenge out of keeping the quilting design aligned.
- Do not have to quilt around applique shapes, which would be similar to "whole cloth" quilting.
- An edge to edge quilting design can be used WITHOUT quilting over the applique shapes.
- If you are using a longarm quilting services, this saves on quilting costs.
- Can be appliqued per hand (if desired).
Considerations
- When adding the applique shapes to a finished & quilted top, there is extra bulk when working under the machine since it is already quilted.
- Depending on the size, it can be challenging to turn an already quilted quilt under the machine a lot when stitching applique.
- Usually an open toe foot is used for stitching applique, which means that applique shapes are sewn on a quilted top without the aid of a walking foot.
- Tension issues have to be taken into consideration with additional layers, ie. batting, backing, quilt top.
- Stitches can be seen from the back, which are usually hidden in the quilt.
- A solid fabric instead of a pieced backing may be more desirable since stitches are seen.
- You lose a little bit of loft behind the applique shape because the batting under the shapes has already been quilted.
- It may not be feasible to machine stich small applique shapes after a quilt has been quilted.
But when deciding to applique before or after quilting, it is essentially an economizing question by asking… what are the most important elements for me for a finished quilt? That stitches are hidden? That there is loft behind the applique shapes? That the quilt is finished faster? That time and money are saved during quilting? What kind of quilting do I prefer – custom quilting that is artistic and highlights the shapes? or an all over design that is subtle and takes a backseat? I would even argue that all these things come down to a matter of taste.
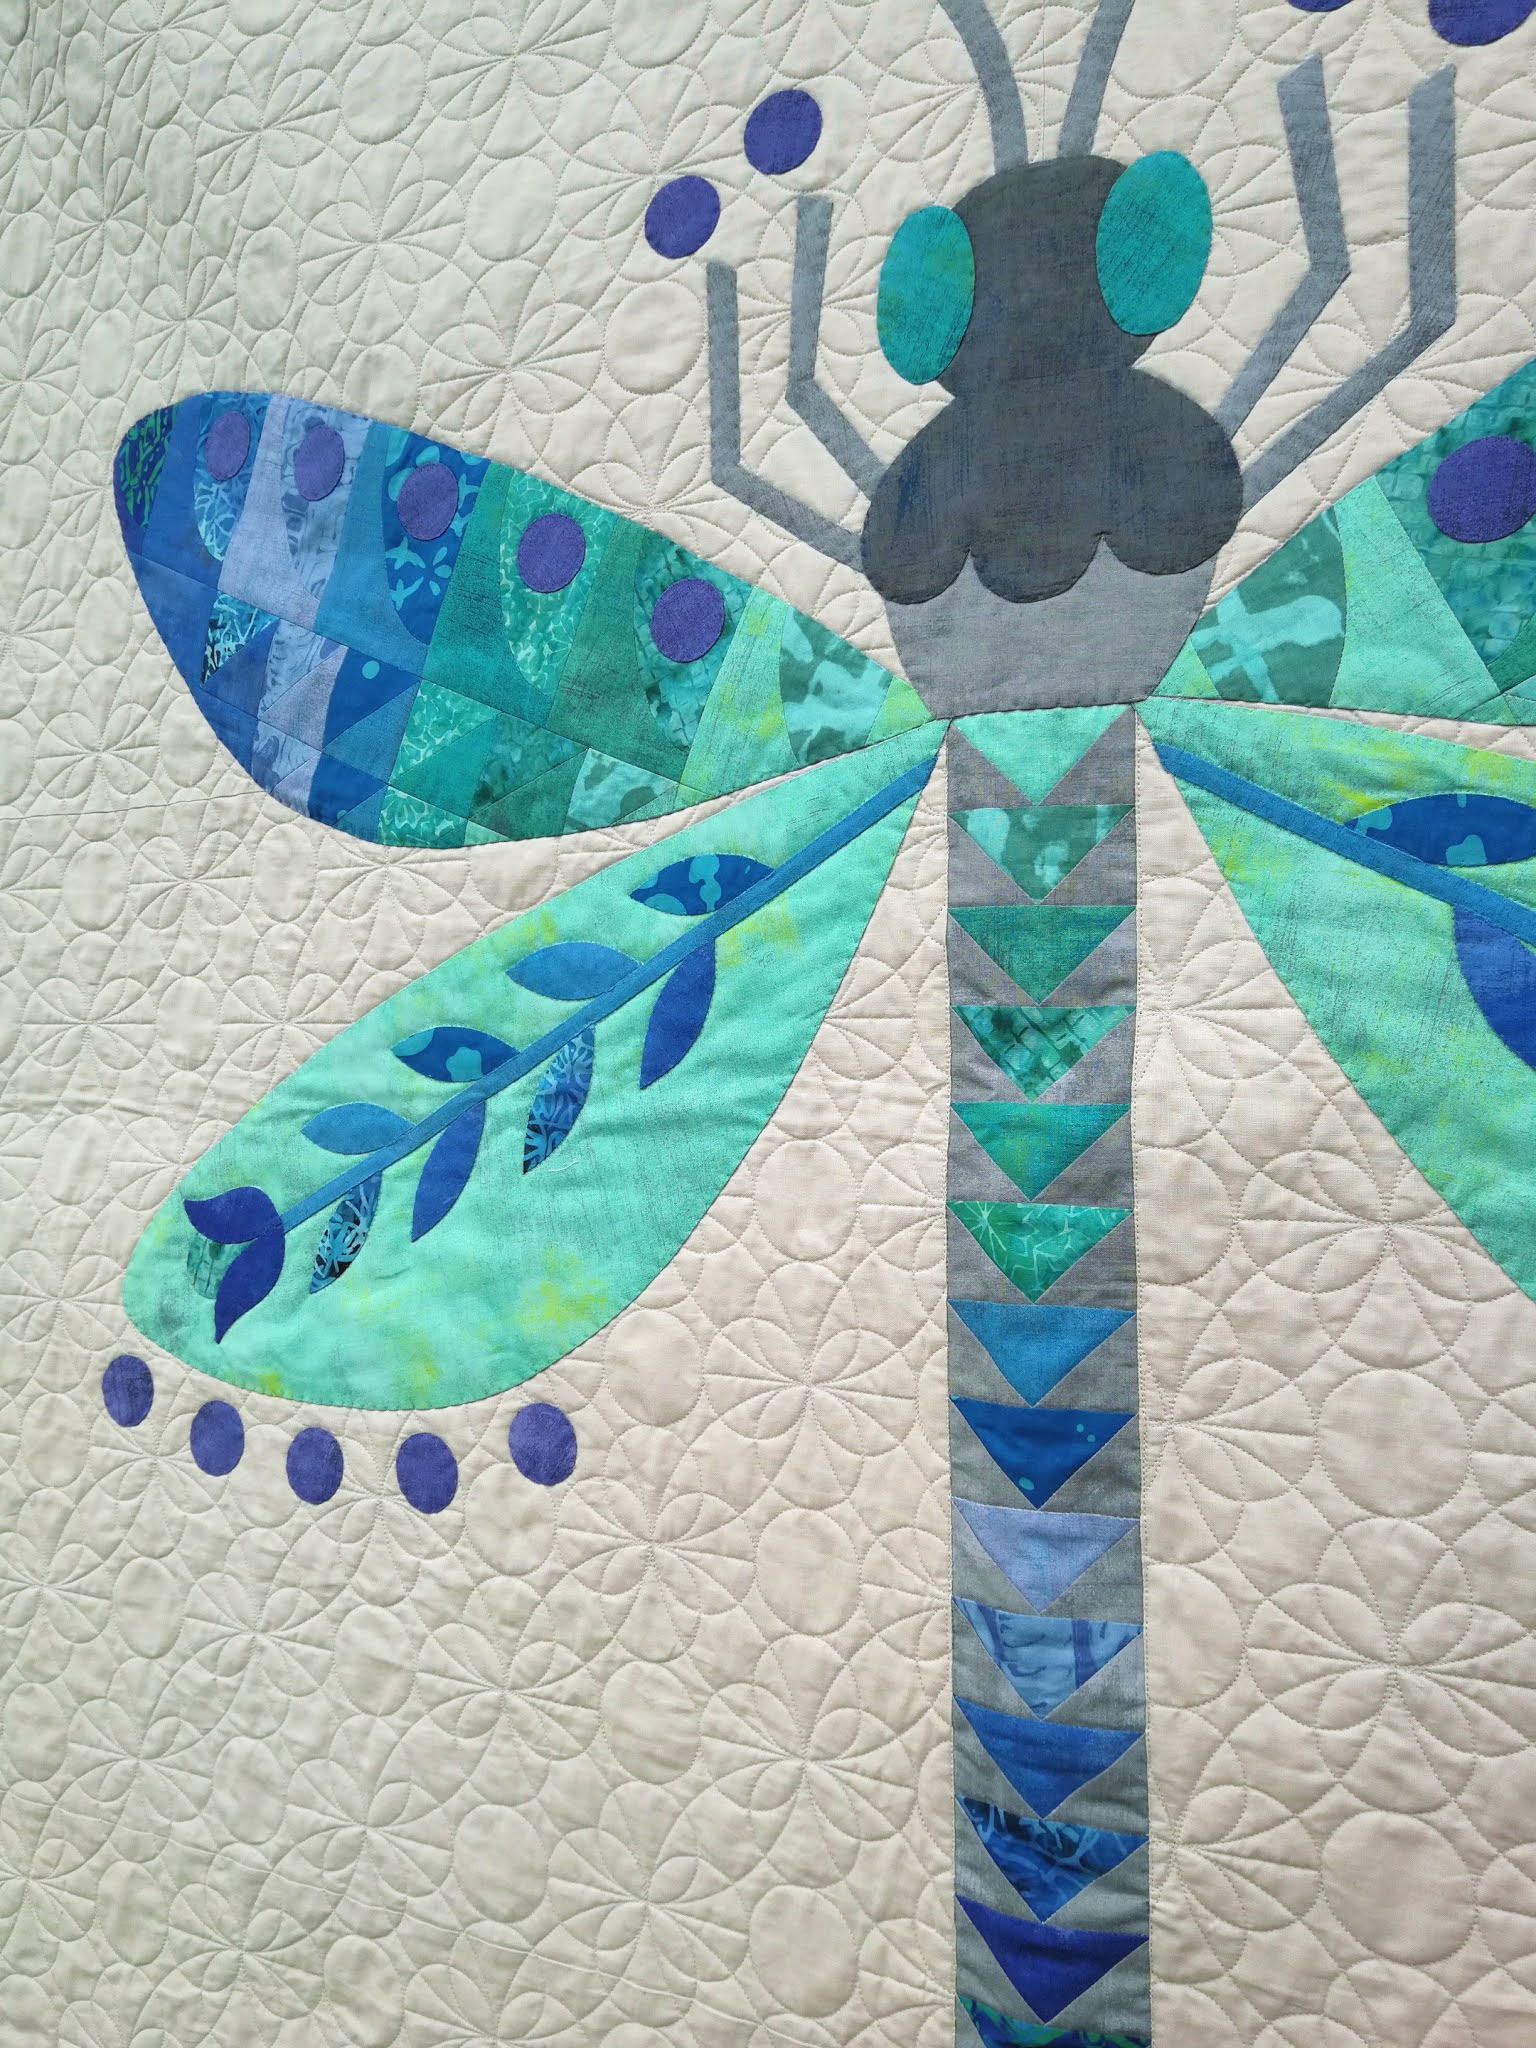
I recently reached out to Rachel from Stitched in Color to ask her if it would be possible to quilt my most recent Fly High, Dragonfly quilt, and set the parameters so that the flying geese tail would be left unquilted. She uses a Gammill Statler, which is a computer-guided longarm machine. The designs that she uses are digital downloads, and Rachel is able to adjust the scale, change proportions or edit details on the computer monitor. She shared with me that the process of quilting is not actually hands-off. She has to periodically give the machine fresh bobbins, reposition the quilt to expose new areas to the needle, make sure the pattern remains properly aligned and troubleshoot any issues with thread tension, etc.
So, now that my piece is quilted, let's get down to The HOW-TO of stitching applique AFTER quilting. Here's what you'll need:
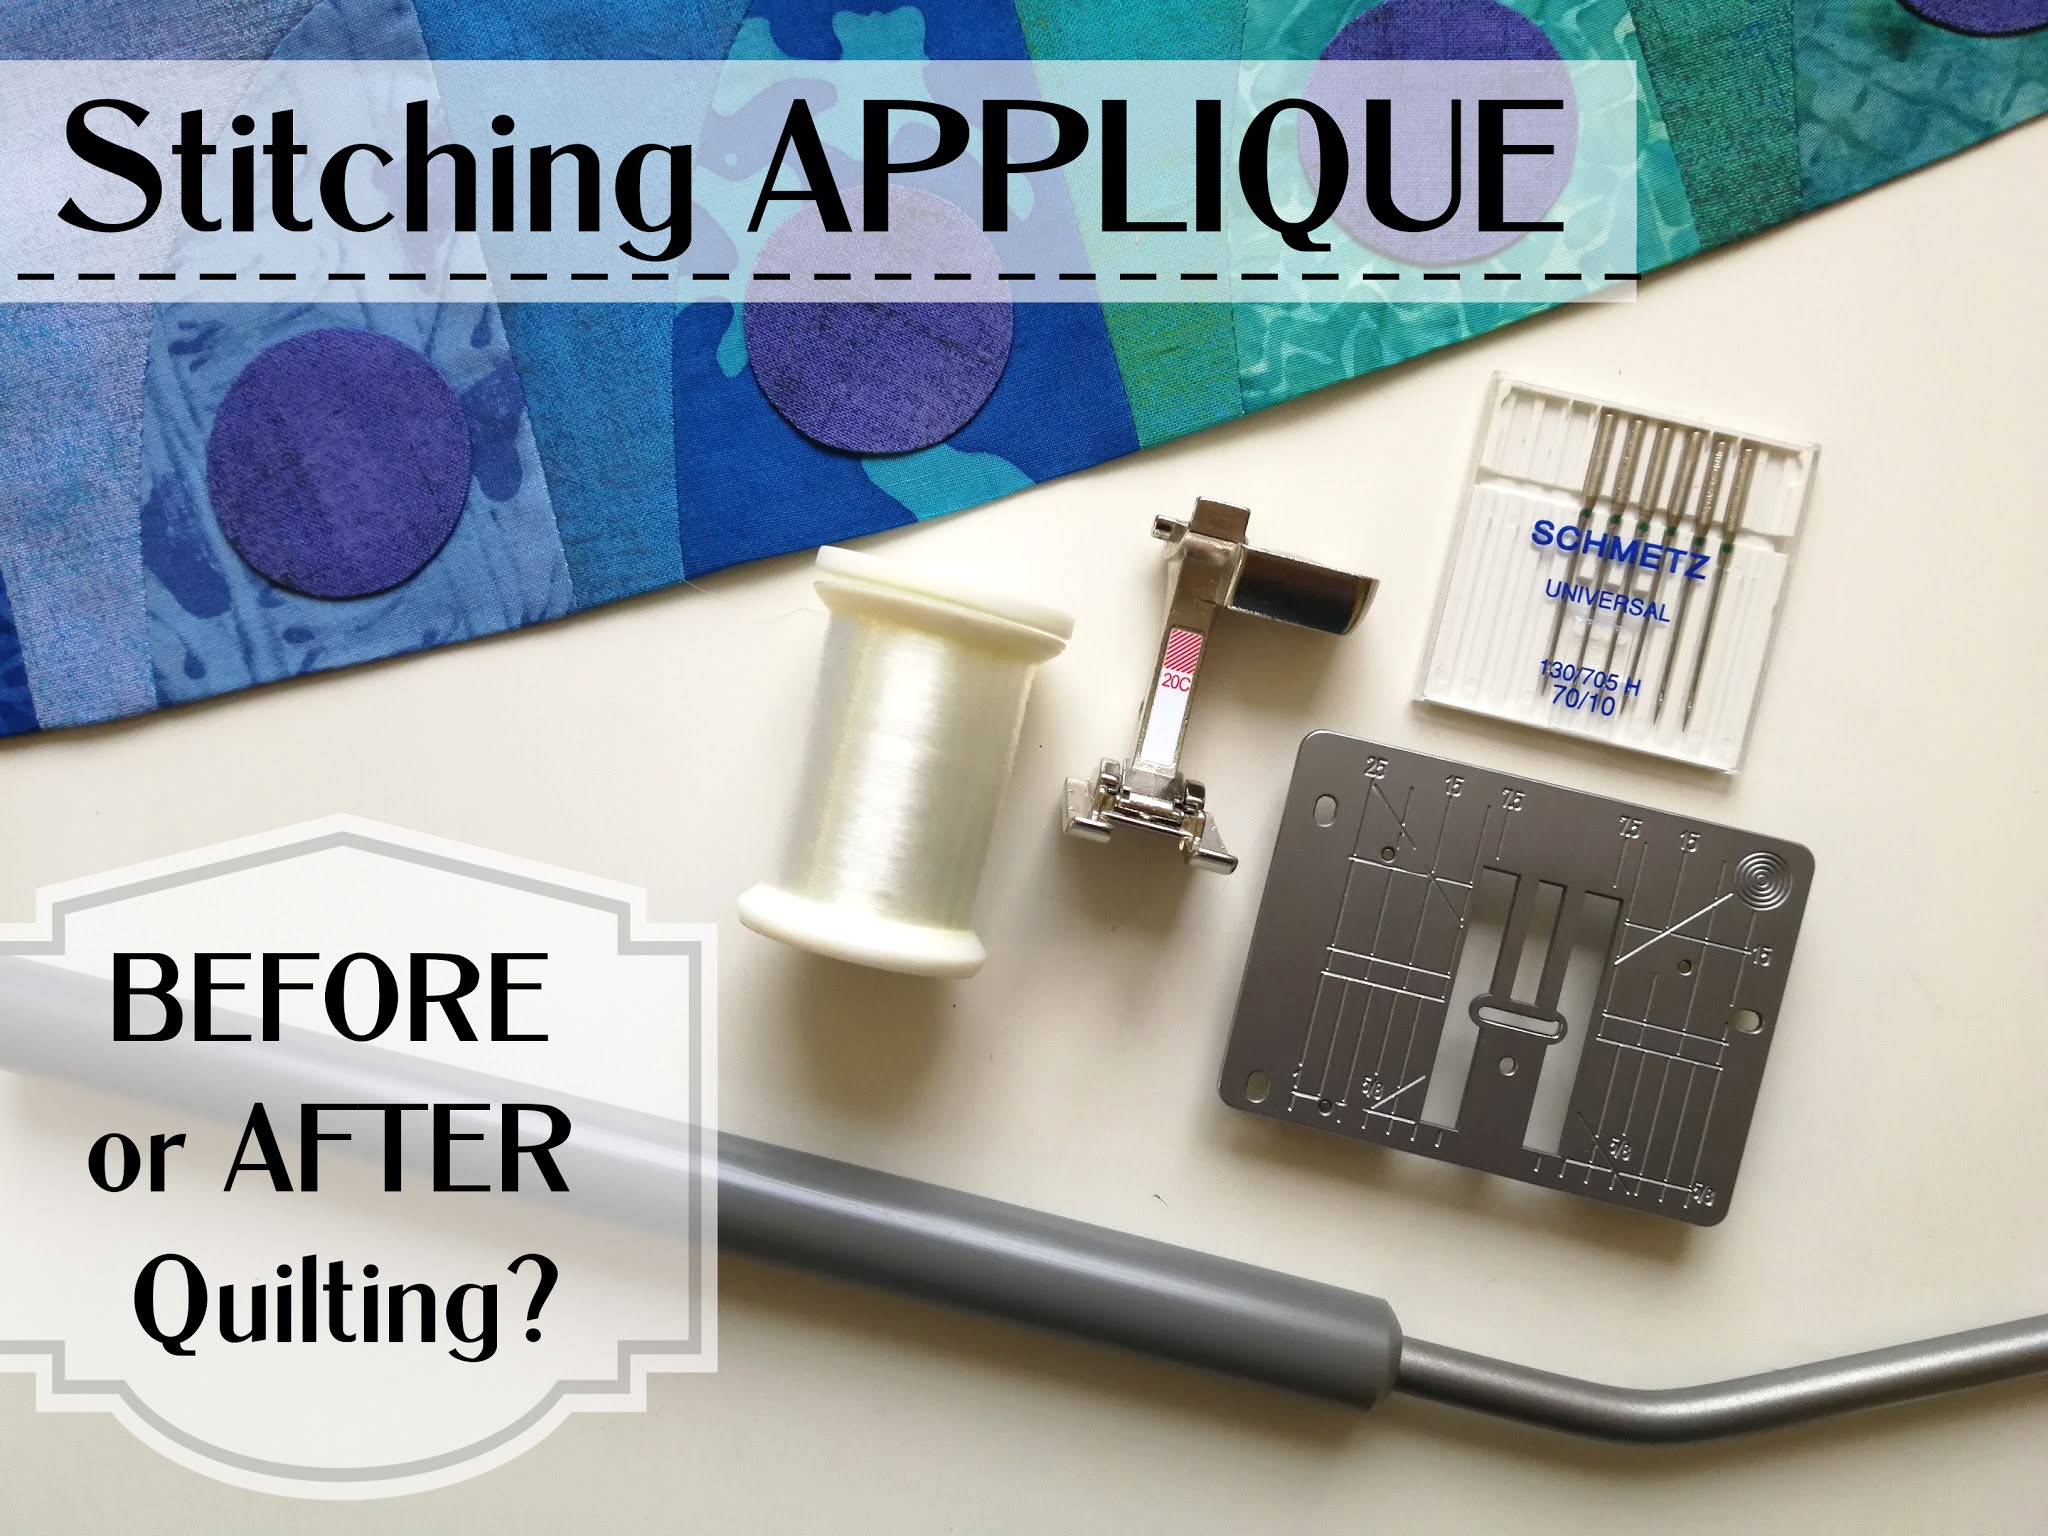
Supplies/Tools- Finished quilted top
- Applique glue
- Pins
- 70 weight needle
- Monofilament /Invisible Thread (Aurifil)
- Open Toe foot
- Knee lift
Before Starting: Stitch Options
Straight stitch: I would actually suggest to use a straight stitch for applique that is stiched beforehand, rather than applique that is stitched to an already quilted top. The reason is that when using a straight stitch to stitch applique shapes to an already quilted top, then the quilting affect is on the shape instead of shadowing it. Usually one would quilt around the shape instead of on it. It can be done, and again, it depends on what things are important to you with a finished quilt.
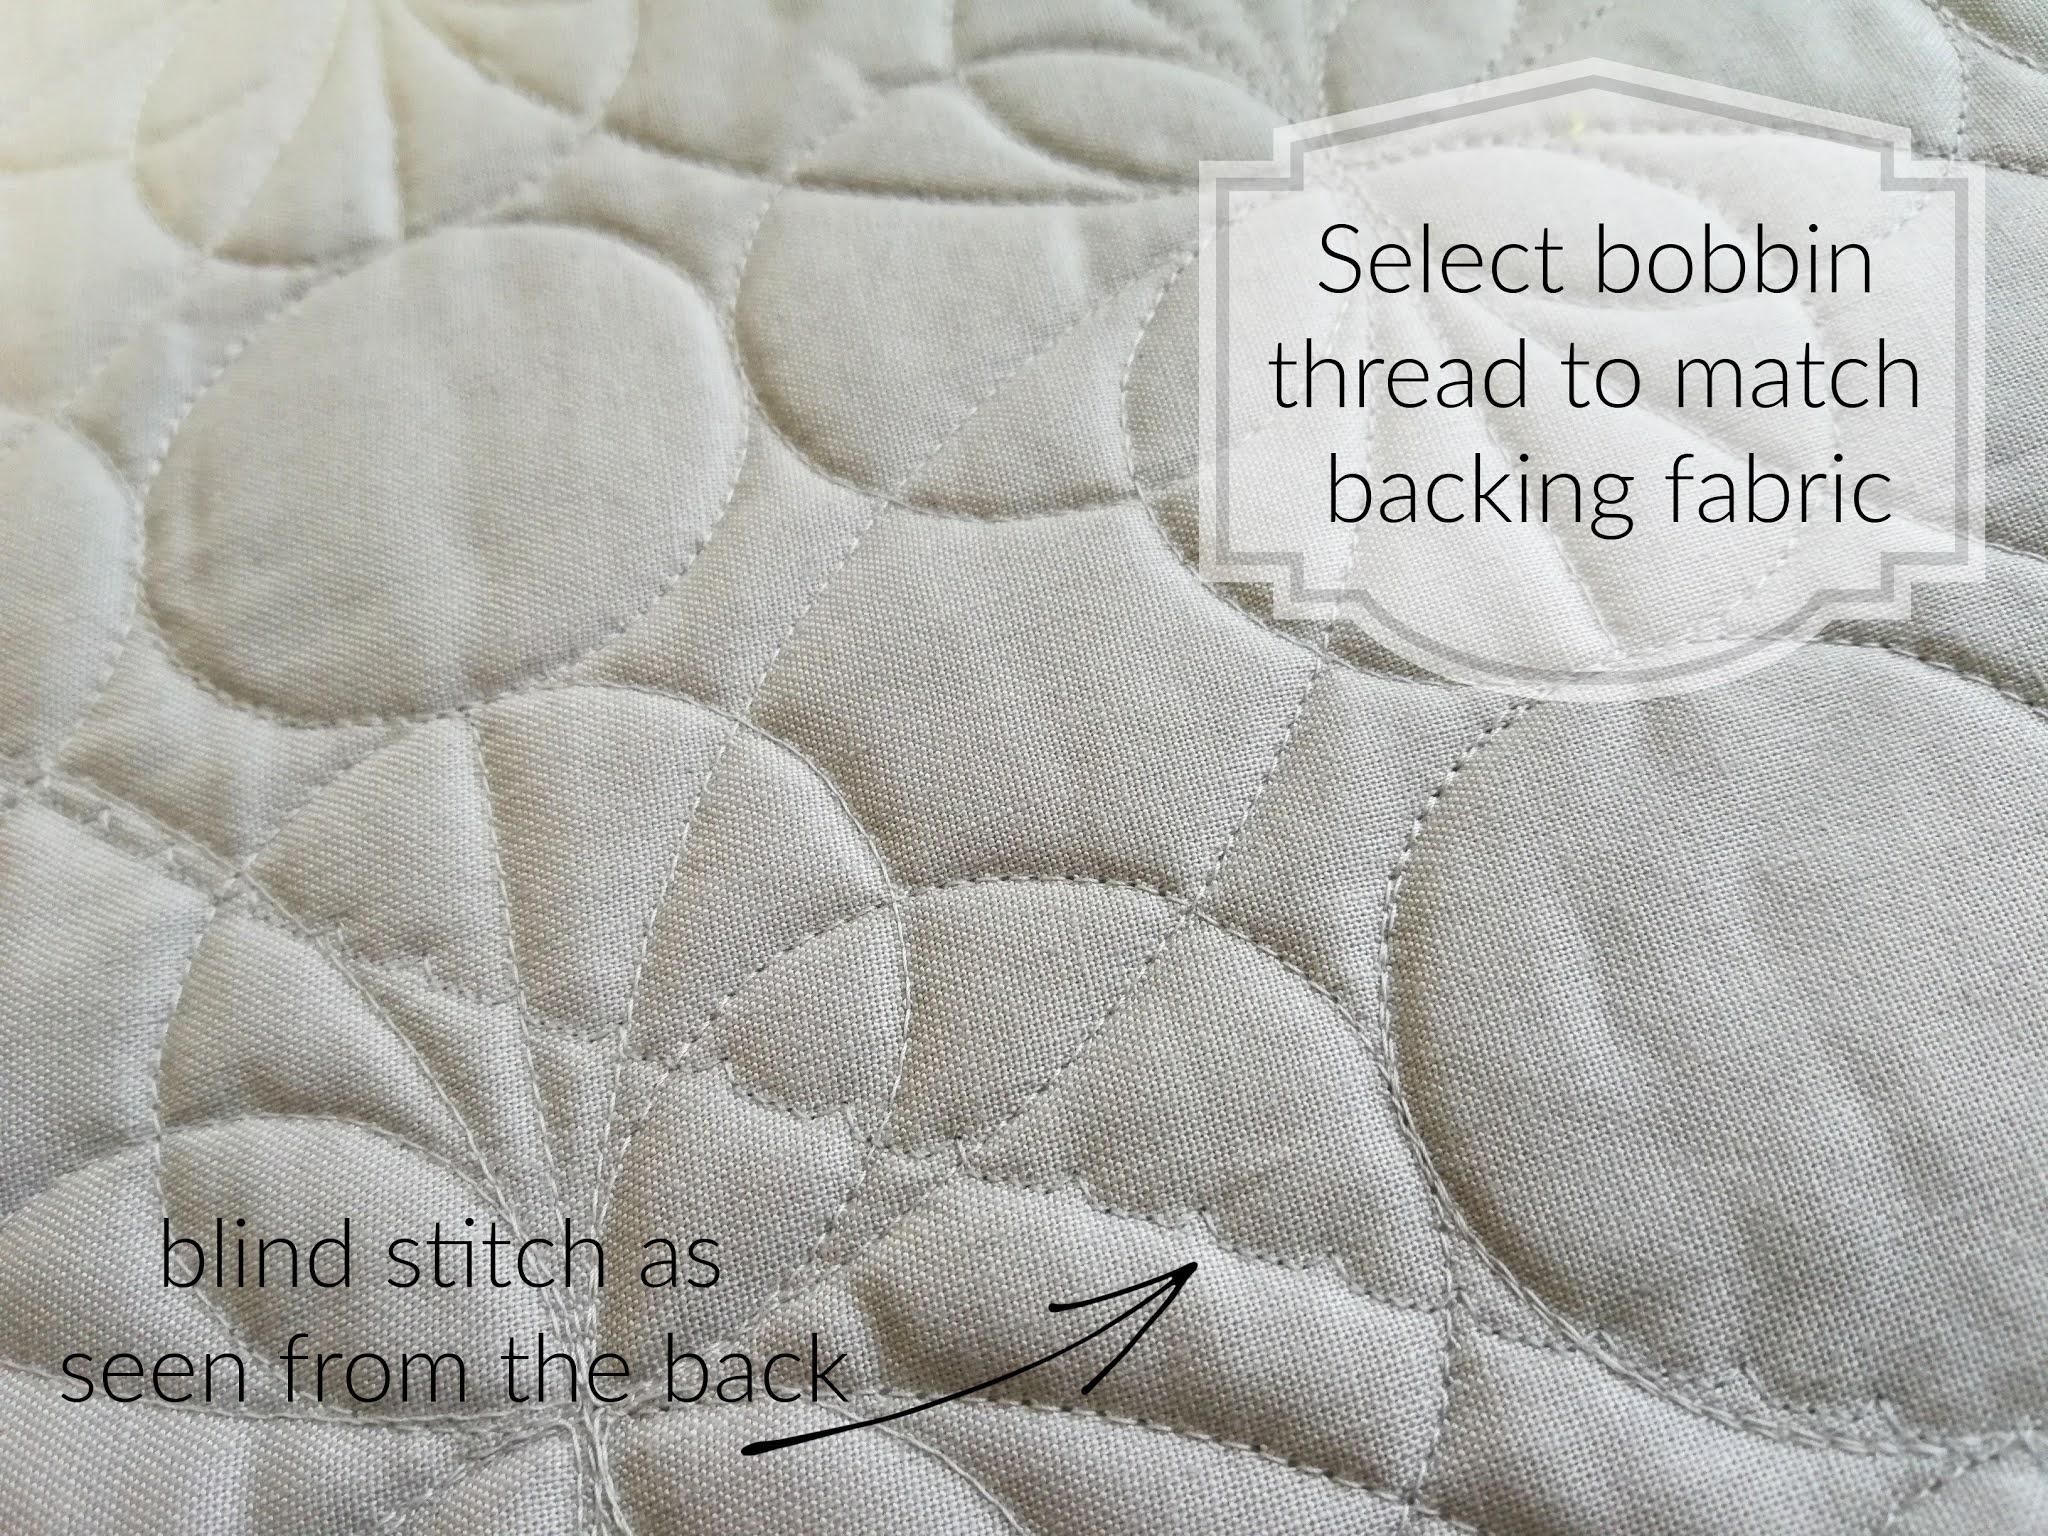
Blind stitch: For me, the biggest advantage of using a blind stitch is that it gives the appearance of a hand-quilted look. The stitches are not as visible as with straight stitches. When using a high-quality monofilament (invisible) thread, it is barely noticeable when transitioning from one color to the next. Hands down, my favorite invisible thread, and the one I use for all my projects is from Aurifil. It is fine, yet does not easily break, and I have never had any issues with ironing, which some cheaper versions can be notorious for.
Machine Settings for Blind Stitch:
If you have never used a blind stitch before, then let me give you a short introduction: A blind stitch is usually used for hemming garments when it is more desirable that the stitches are not seen. It sews several straight stiches, which are beside the fold or applique shape, and one “zig-zag” stitch that comes over and takes a “bite” to hold the fabric in place.
Before getting started, if you are using a larger machine like I am, it’s important to change out your stitch plate. Usually I am using an open toe foot for a blind stitch, and the stitch plate needs to accommodate the zig-zig movement.
When using a blind stitch, it is important to change a few settings. With every machine, the settings will be different, so it is a little bit of trial and error when deciding on length, width, and tension settings. With this in mind, I would suggest to practice on a few samples before moving to your project. Here are a few things that you will need to adjust on your machine:
- Stitch Length: By shortening the stitch length, the zig-zag “bites” come closer together. Since it is the “bites” that hold the applique in place, when they are closer together, there are more to hold the shape in place.
- Stitch Width: Your stitch width will determine how wide your “bite” zig-zag is. This will determine how narrow or wide the “V” that secures your applique shape. I prefer a narrow width so the stitch is barely seen.

- Thread tension: This setting is a pretty important setting to change, as you are sewing on an already quilted quilt. I lower the thread tension even more when stitching on an already quilted piece than I would if I were only stitching applique on a block or a quilt top. Usually for blocks, I will lower the tension to 1.0, and for stitching applique on an already quilted piece, I will lower it to 1.5. If your applique shape looks a little "pulled", then you may need to lower the tension even more.
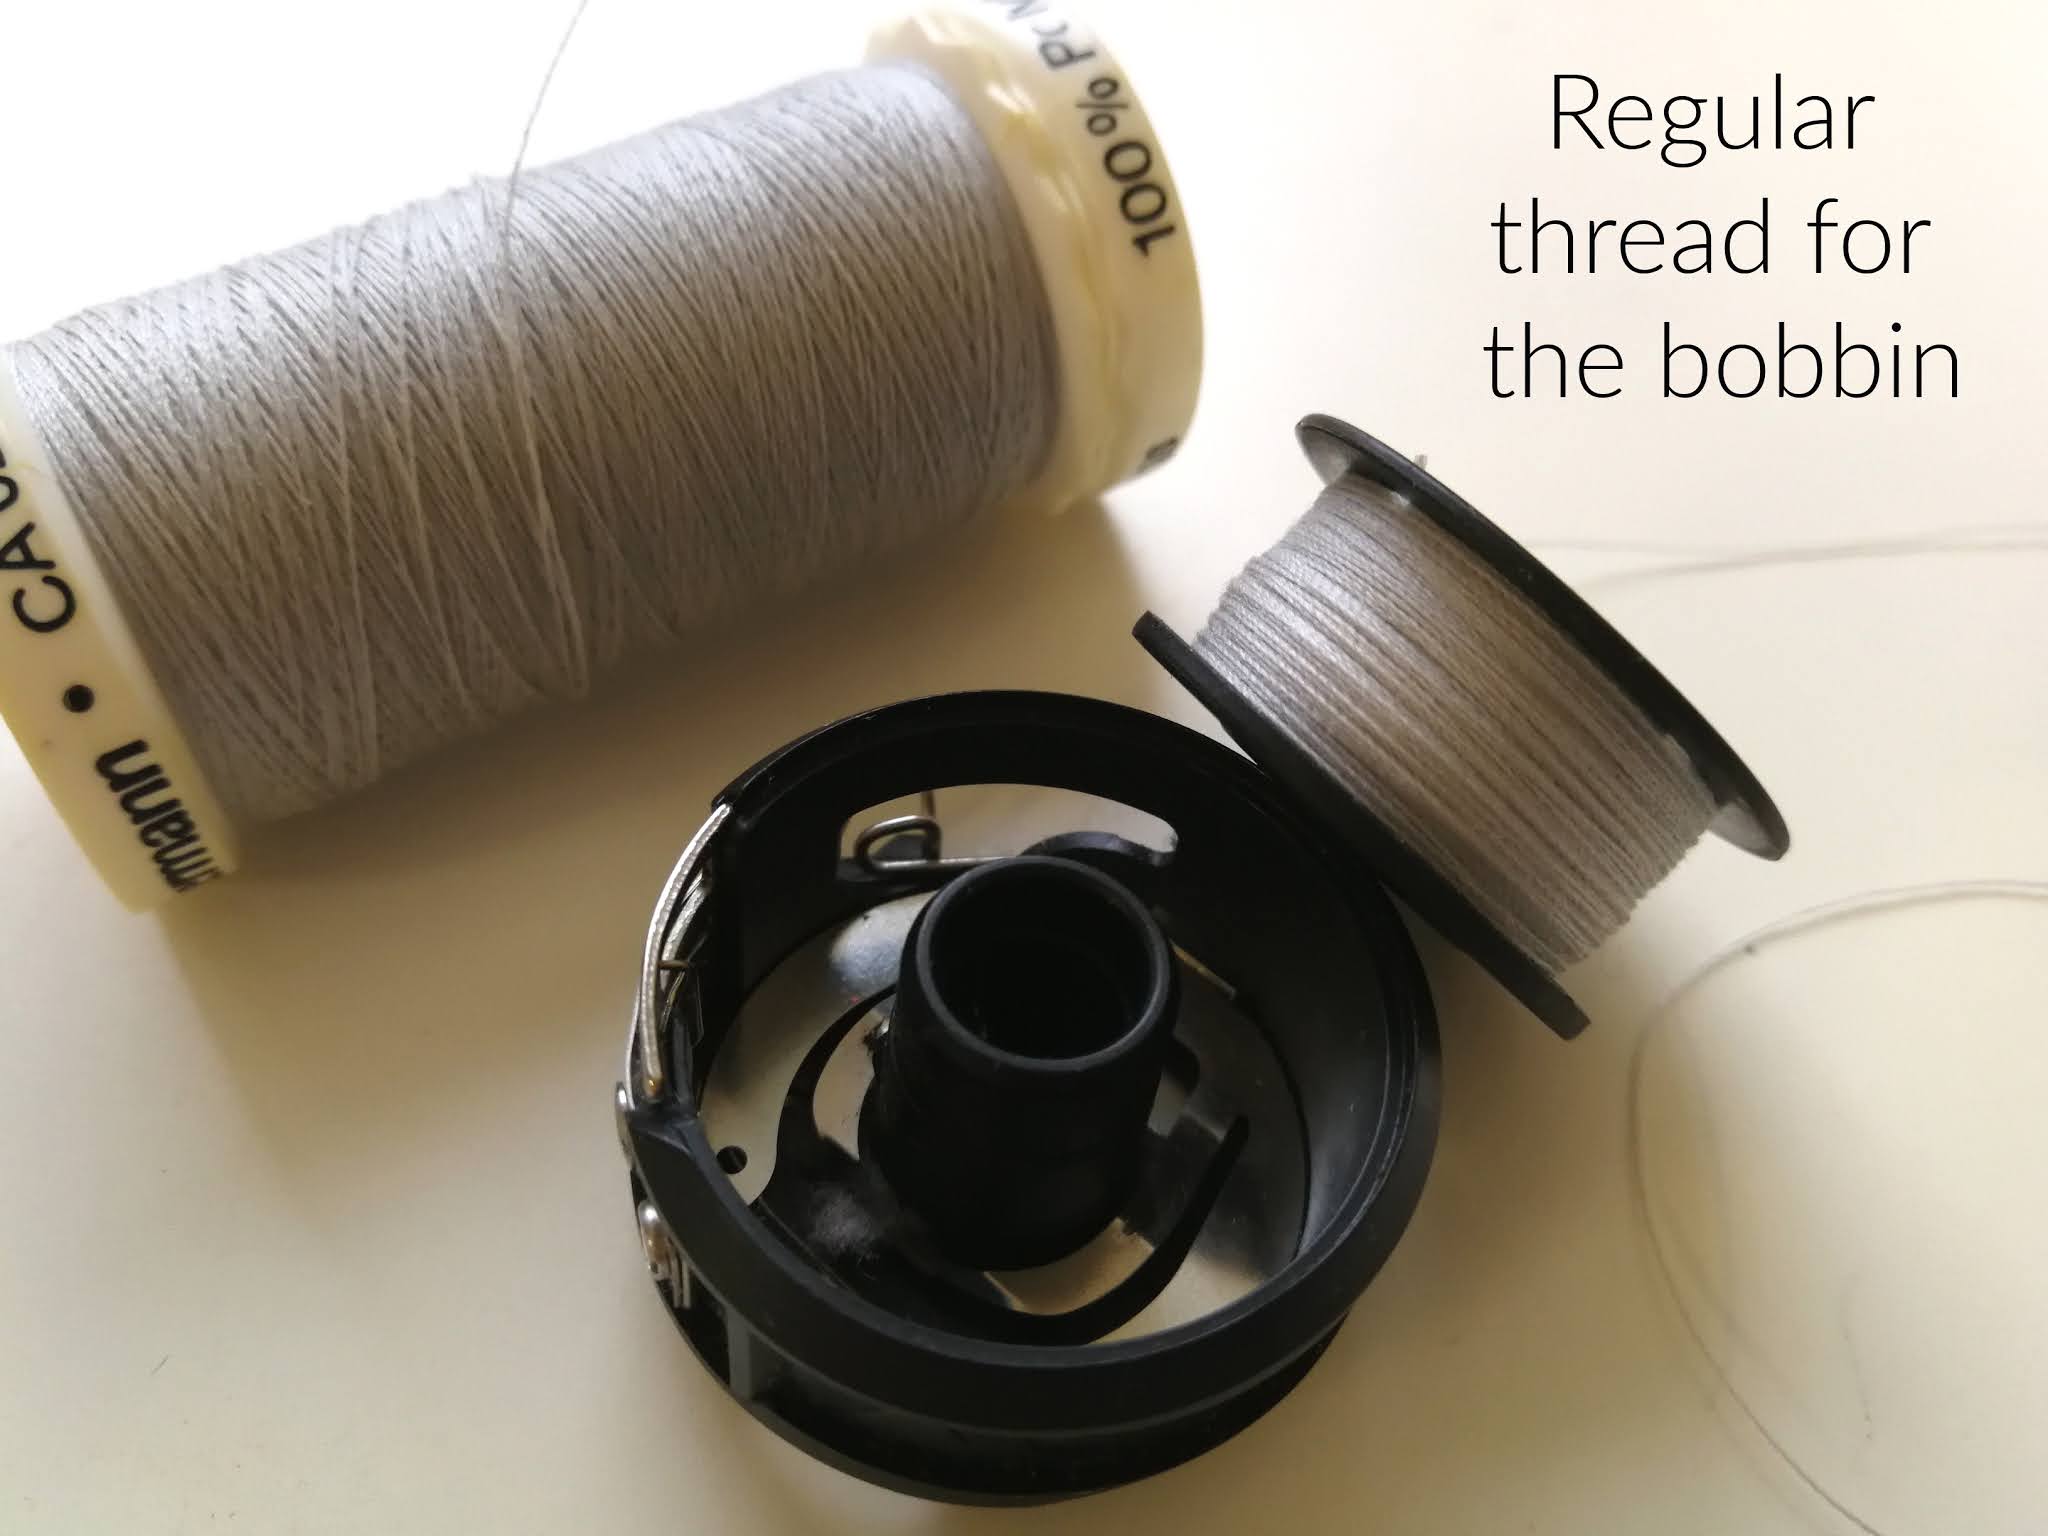
Once you have your machine settings in place, let's move on to thread: When using a monofilament thread, remember that it is for the top thread ONLY. While there are some quilters that use an invisible thread for the top and bobbin threads, I prefer to keep it only on the top.
For the bobbin thread, a standard thread is sufficient. Because you are working with two
different types of thread, AND sewing on an already quilted piece with additional layers, that's
why it is important to stress again, to adjust the thread tension to accommodate for this.
Adding the applique shapes:
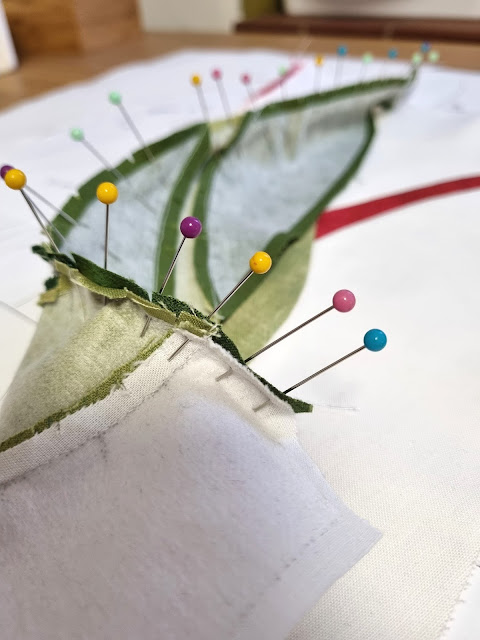
When I am working with extra large applique, I will work with the quilt top (or quilt in this case) on my design wall. I am able to check placement much easier when the surface is flat, and I can look at it from a distance. This way I am also able to pin the shapes in place before gluing them. I
started by gluing the bottom wings in place, and then moved to the
sewing machine. When I glue extra large shapes, I will glue it in
sections, and then pin the glued section so it stays in place before
moving to the next section.
If you have never worked with a knee lift, this is the point where I always suggest to try it out. With the smaller shapes like the circles, I end up turning the quilt a lot under the machine, and it's a huge advantage to be able to be able to turn the quilt so often - hands free!
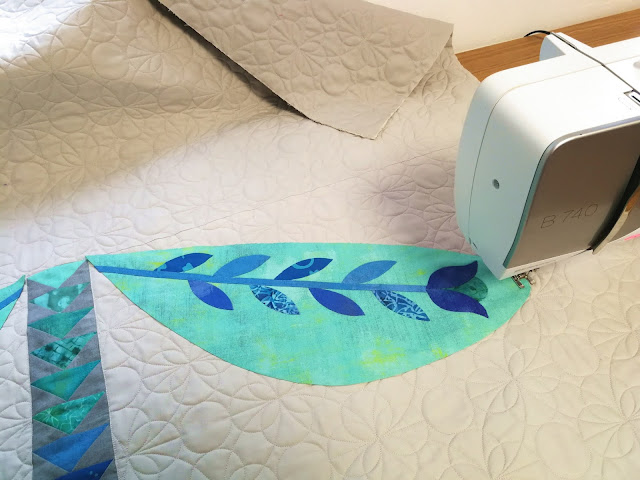
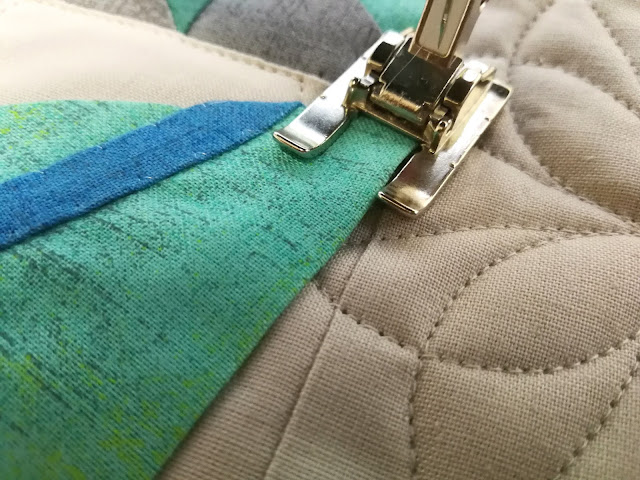
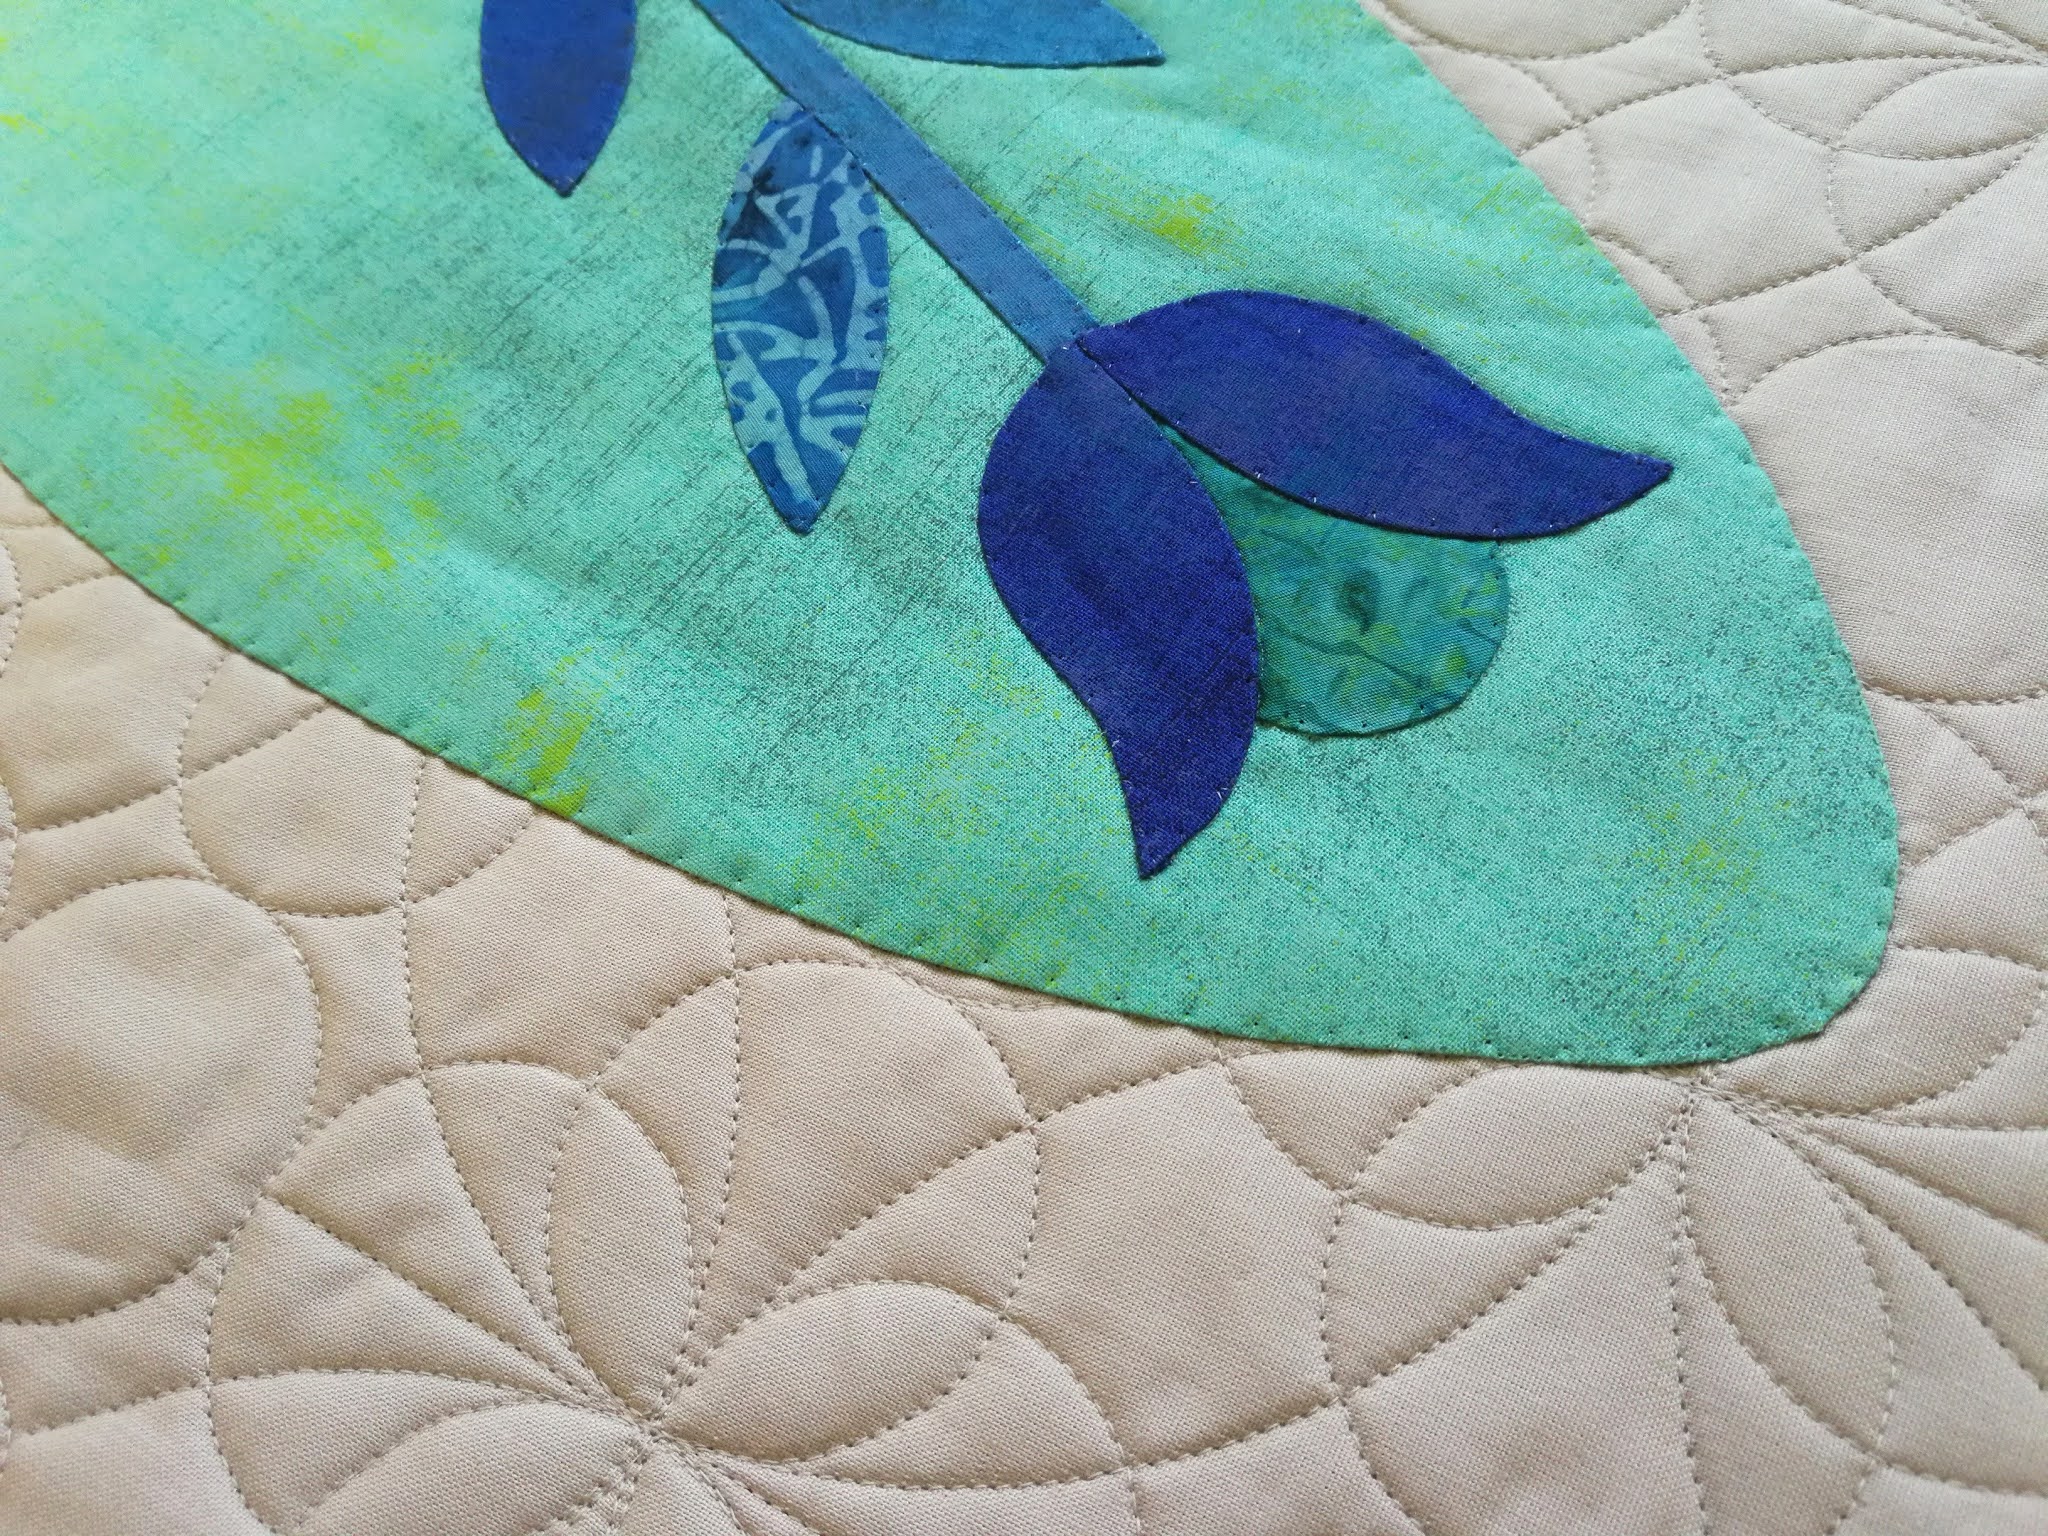
When using a blind stitch, I will change to my open toe foot so I can sew along the side of the applique shape, and see where the blind stitch will come over and catch. The stitches beside the shape are your straight stitches, and the zig-zag that comes over are your securing stitches. Be careful that the straight stitches are beside the applique and not on it. Only the zig-zig bite should be coming over on the applique shape.
For this quilt, I actually stitched the stems, leaves, and flowers on the lower wing unit before I stitched the entire wing to the quilted piece. After the wings were stitched in place, I then went back and shadow quilted around the applique shapes to add additional quilting and secure the large shape in place without shifting later. Here is a short video, where I talk about the process for stitching applique BEFORE quilting. When stitching applique after quilting, the concept is essentially the same, with the biggest adjustment being in the tension settings.
When using a thread color that matches the quilt back fabric, the stiches are barely noticeable. This could possibly be considered a "con" to stitching the applique after quilting, but since you really have to look to find the stitches, I'm not ready to fully put it in that category.
So what's your take... stitching applique before or after quilting? Ready to give it a try? Since I love the idea of combining more complex quilting designs with my applique, I will definitely explore this option again.
Be sure to stop by Rachel's blog
as she is comparing the two approaches from a longarm quilters aspect.
She always has such insightful input on quilting projects.


